This post is going to be a bit more of a tutorial,
rather than an 'essence'. The ratio is dead simple, but in this case, it's the
method that's the tricky part. I've got lots of lovely pictures of my technique
and the appetising results, so it shouldn't be too boring.

Hands up who knows how normal puff pastry is actually made? It just
comes out of the freezer, right? It’s actually microscopically thin layers of
butter in between the layers of pastry, that make it puff up. When the water in
the butter evaporates and turns to steam in the heat of the oven, it expands
and pushes the pastry layers upwards around it. No chemicals required.
In ‘real’ puff pastry, those layers are extremely precise. You lay the
butter out between two layers of pastry and then you keep folding and rolling,
keeping all the butter in straight and uniform layers. It’s a delicate process
and it takes a long time. That method is pretty similar to what you use for
Danish Pastry.
For rough puff, the layers are more uneven. Instead of spreading the
butter uniformly in one layer, you just leave it in chunks, and fold and roll
it a few times to flatten it out. It has a similar effect. The rise is (very)
slightly reduced, and a bit less uniform looking, but it’s barely noticeable
and still delicious.
The ratio, as I said, is dead easy:
1 Flour : 1 Butter
It's important to use butter. You could probably use lard, but it has to be something with the same melting point as butter - solid at room temperature. If you use margarine or anything soft, it will all just blend in with the flour and won't create the layered effect we need. There’s
also water involved, but it’s an indeterminate amount and it doesn’t affect the
ratio. The amount of pastry you make will be equivalent to a bit more than the
total weight of the ingredients. If you use 250g of butter and 250g of flour,
you’ll get about 600g of finished pastry. Most recipes tell you how much pastry
you’ll need by weight, so it’s easy to adjust your own amounts. I’ll talk more
about fillings later. Onto the method.
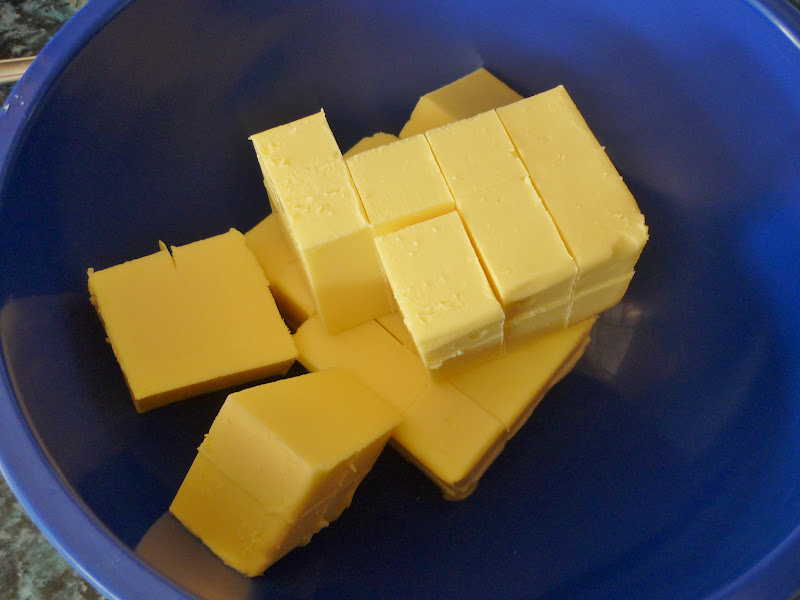
- Cut up the butter. It should be in cubes of about 1.5-2cm across. It doesn't have to be very exact, and it’s probably better to have the chunks too big than too small, because you can always break them up a bit more later.
- Weigh in the flour. You could sieve it if you want, I almost never bother with that these days.

- Get some cold water. As cold as possible. We need to do everything in our power to stop the butter from melting during this process. Run-cold from the tap is good, a small jug of water in the fridge beforehand is even better.
- Add a bit of cold water to the bowl, and mix it. It’s much easier to use your hands than to try and use a wooden spoon or anything. The bits of butter are big and get in the way of the mixing, so it’s easier to turn it all over by hand.

- Keep adding the water bit by bit, until it turns into a sort of dough. It can be tricky to tell when it’s got the right amount, but you have to try and trust your instincts. You want it to all be stuck together – if bits of it would pour out between your fingers there’s not enough water. But you don’t want it to be too wet – if it would stick to the underside of your hand, there’s too much water. If you add too much water, just add flour until the consistency is right again.
- Now it’s rolling time. First, clean your surface, and then make sure it’s dry. After that, flour it. (That just means, sprinkle some flour on it, like this:)

- Turn your dough out onto the floury surface and get yourself a rolling pin or similar-sized cylindrical object. Start rolling. It will look like it’s impossible to flatten out at first.

- Keep going. It will soften up gradually, and start to spread out. You might find it easier to pick up the pastry and turn it over, or turn it by 90° in between rolls. Just make sure there is always plenty of flour all over the surface – if it starts to stick when you pick it up, then add more flour.

- Soon it will look like you might expect pastry to look. Keep rolling, trying to keep it in some kind of rectangle. It doesn’t matter if it’s a long and thin rectangle or an almost-square rectangle; just try to keep the edges fairly straight. Roll out until it’s about half a centimetre thick. At this point you may decide to split your pastry into two parts, and roll them separately. If you can roll your pastry out to half a centimetre thick without going off the edges of your work surface, then there’s no need. If it keeps nearly going off the edges or is getting uncomfortably big, just cut it straight down the middle, put one half to the side and work on the other half first.

- Now you should have a nice big rectangle(-ish) of pastry that’s about half a centimetre thick. Time for the folding. You can fold it any which-way you like really. As long as you get lots of layers in there, it’s up to you. A general guide would be to fold it into thirds at least two or three times, or to fold it in half at least three or four times.
- What that actually means: when your pastry is fully rolled out the first time, fold it up. Either, fold one half straight over the other, leaving it half of the size (this is folding it in half). Or fold one third across the middle, and then the other third across that one, like a letter (this is folding in thirds). Once you’ve folded it, get rolling again. Keep rolling and turning until it’s back to the size and thickness it was before. Then repeat as many times as you want. If you’re folding in half, I’d recommend a minimum of three to four times, or for thirds a minimum of two to three times. Or you could mix and match and do some of each. As long as you get a decent number of folds you can’t fail.

- If at any point you notice the pastry looking greasy, or it feels very warm or you can actually see patches of butter melting, then take a break. Fold it up into a manageable size, wrap it in clingfilm and put it in the fridge for half an hour or so. It’s important to keep the butter solid, because if it melts into the pastry then it won’t have the puffing effect, and you’ll just have extremely rich shortcrust pastry instead.

- Once you’ve folded it enough times, just fold it up into a manageable size again and put it in the fridge. It will easily keep for several days, and will probably freeze well (although I haven’t tried that myself).

I’ll be making a post next week about what I filled mine with, and some other info and suggestions about fillings.
No comments:
Post a Comment